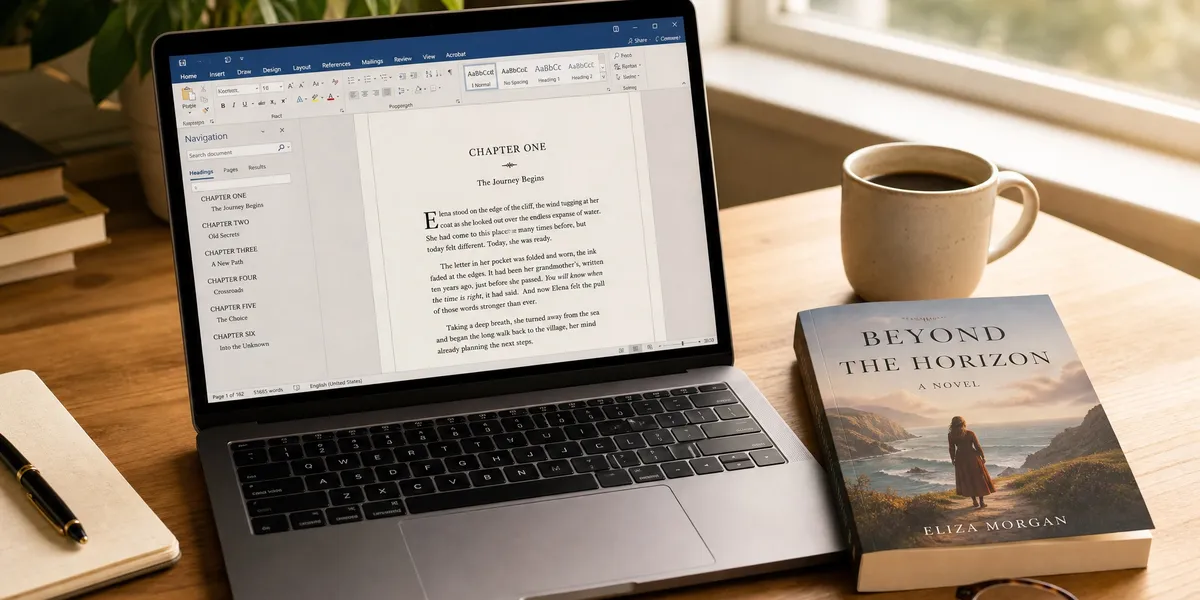
You can format a book in Microsoft Word that looks professional enough for print or ebook publishing — no expensive software required. Word has every feature you need: custom page sizes, mirror margins, heading styles, headers, footers, and PDF export.
In this guide, you’ll learn:
- How to set up your Word document with the correct trim size and margins
- Which fonts and spacing settings make your book look professionally published
- How to add headers, page numbers, and a table of contents
- The export process for both print-ready PDFs and ebook files
Here’s the complete process, step by step.
Can You Really Format a Book in Microsoft Word?
Yes — Microsoft Word can produce print-ready and ebook-ready book files if you configure the settings correctly. Most self-published authors on Amazon KDP, IngramSpark, and other platforms use Word as their primary formatting tool because it’s accessible and familiar.
Word handles everything from custom page sizes to mirror margins and automatic tables of contents. The catch? Word doesn’t set these up for you automatically. You need to configure each setting manually, which is where most authors run into trouble.
Dedicated book formatting software like Vellum or Atticus can automate much of this. But if you already own Word and want full control over your layout, this guide walks you through every setting.
Step 1: Set Your Page Size (Trim Size)
Your trim size is the final width and height of your printed book after binding and cutting. This is the first setting you should configure because it affects every other formatting decision.
Go to Layout > Size > More Paper Sizes and enter your custom dimensions.
Here are the most common trim sizes by genre:
| Genre | Trim Size | Best For |
|---|---|---|
| Fiction / Novels | 5.5” x 8.5” | Standard trade paperback |
| Nonfiction / Business | 6” x 9” | Professional, spacious layout |
| Memoir / Literary | 5.25” x 8” | Compact, elegant feel |
| Children’s Books | 8.5” x 8.5” | Square picture book format |
| Academic / Textbook | 7” x 10” | Larger format for diagrams |
The most popular choice is 6” x 9” — it works for both fiction and nonfiction, and every major platform accepts it.
Make sure you set the page size before you start formatting text. Changing it later shifts your margins, line breaks, and page counts.
Step 2: Configure Your Margins and Gutter
Margins control the white space around your text. The gutter adds extra space on the inside edge of each page to account for the book’s spine and binding.
Go to Layout > Margins > Custom Margins and configure these settings:
Recommended margins for a 6” x 9” book:
| Setting | Value |
|---|---|
| Top | 0.75” |
| Bottom | 0.75” |
| Outside (left/right) | 0.5” |
| Inside (gutter) | 0.75” |
Under Multiple pages, select Mirror margins. This ensures your left and right pages mirror each other, with the gutter always on the inside edge near the spine.
Why mirror margins matter: In a printed book, left-hand pages and right-hand pages have different inside edges. Without mirror margins, your text will look off-center when the book is open.
For books over 300 pages, increase your gutter to 0.85” or even 1” — thicker books need more space near the spine for readability. Check your platform’s requirements: KDP has specific margin rules based on page count.
Step 3: Choose Your Fonts and Sizes
Your font choice directly affects your book’s readability and professional appearance. This is where book typography best practices make the biggest difference.
Body text: Use a serif font between 10pt and 12pt. Serif fonts have small decorative strokes at the ends of letters that guide the eye across long passages of text.
Best body fonts for books:
- Garamond (11pt) — the publishing industry standard, elegant and highly readable
- Georgia (11pt) — designed for screens and print, slightly wider than Garamond
- Palatino (11pt) — warm and readable, works well for literary fiction
- Baskerville (11pt) — classic and refined, popular in academic publishing
- Times New Roman (12pt) — acceptable but considered generic by experienced readers
Chapter headings: Use a contrasting font at 18-24pt. You can use the same serif font as your body text in a larger size, or pair it with a clean sans-serif like Arial, Calibri, or Helvetica for contrast.
To set your fonts consistently: Right-click the Normal style in the Styles panel and choose Modify. Set your body font here, and every paragraph using the Normal style will update automatically. Do the same for Heading 1 (chapter titles) and Heading 2 (section headings).
Using Word’s built-in styles instead of manual formatting saves hours and prevents inconsistencies across a full manuscript.
Step 4: Set Line Spacing and Paragraph Formatting
Line spacing and indentation are the invisible architecture of your book’s pages. Get these wrong and your book feels cramped or overly airy.
Line spacing: Go to Home > Line Spacing or open the Paragraph dialog box. Set line spacing to 1.15 to 1.5 for print books. A spacing of 1.3 is a solid default for most genres.
Do not use double spacing for your final book — that’s a manuscript submission standard, not a book formatting standard.
First-line indent: In the Paragraph dialog box, set Special to First Line and enter 0.3” to 0.5”. This automatically indents the first line of every paragraph without you pressing Tab manually.
Important exceptions to first-line indentation:
- The first paragraph of each chapter should NOT be indented (this is a typographic convention)
- Paragraphs after headings, block quotes, and lists should not be indented
- Scene break paragraphs should not be indented
Paragraph spacing: Set Before and After spacing to 0pt for body text paragraphs. The first-line indent replaces the need for extra space between paragraphs in most book genres.
For nonfiction with lots of sections, you might use 6pt spacing after paragraphs instead of first-line indentation — this creates a more modern, business-book feel.
Step 5: Set Up Headers and Footers
Professional books use headers and footers to display the author name, book title, and page numbers. Here’s how to configure them in Word.
Enable different odd and even pages: Double-click in the header area of any page. In the Header & Footer toolbar, check Different Odd & Even Pages. Also check Different First Page so your chapter opening pages can have blank headers.
Standard header layout:
- Even (left-hand) pages: Author name, left-aligned
- Odd (right-hand) pages: Book title or chapter title, right-aligned
- Chapter opening pages: No header (blank)
Use a smaller font size for headers — typically 2 points smaller than your body text, in the same font family. Set the font color to a slightly lighter shade if you want a subtle, professional look.
To prevent headers from appearing on chapter title pages, place your cursor on the first page of a new chapter, double-click the header, and check Different First Page in the section settings.
Step 6: Add Page Numbers
Page numbers are essential for any book longer than a few pages. Word gives you flexible placement options.
Where to place page numbers: Go to Insert > Page Numbers and choose your preferred position. The most common placement for books is bottom center or bottom outside (alternating left and right).
Front matter numbering: Your front matter (title page, copyright page, dedication, table of contents) should use lowercase Roman numerals (i, ii, iii). Your main content should restart at Arabic numeral 1.
To set this up:
- Insert a Section Break (Layout > Breaks > Next Page) between your front matter and chapter one
- Double-click the footer in chapter one
- Uncheck Link to Previous
- Go to Insert > Page Numbers > Format Page Numbers
- Set the format to Arabic numerals and select Start at: 1
Pages that should not show page numbers:
- Title page
- Copyright page
- Half-title page
- Chapter opening pages (optional — some publishers show them, some don’t)
For creating a full table of contents, use Word’s built-in feature under References > Table of Contents. This only works if you’ve applied Heading styles to your chapter titles.
Step 7: Format Your Chapter Title Pages
Chapter title pages set the visual rhythm of your book. Consistent, well-designed chapter openings signal professional quality.
Standard chapter title page layout:
- Start each chapter on a new page using a page break (Insert > Break > Page Break) — never by pressing Enter repeatedly
- Drop the chapter title about one-third to one-half down the page by adding space before the heading
- Use your Heading 1 style for the chapter title (18-24pt, centered or left-aligned)
- Add 2-3 blank lines between the title and the first paragraph
- Do not indent the first paragraph of the chapter (typographic convention)
To add consistent drop space above chapter titles: Modify your Heading 1 style to include 200-300pt of Space Before in the paragraph settings. This pushes the heading down the page automatically.
Chapter numbers vs. chapter names:
- Fiction typically uses numbers: “Chapter 1” or “One”
- Nonfiction often uses descriptive titles: “Chapter 3: Finding Your Voice”
- Some books use both: “Chapter 3 — Finding Your Voice”
Pick one style and apply it consistently throughout your entire manuscript.
Step 8: Handle Front Matter and Back Matter
Your book’s front matter and back matter are the professional bookends that separate a polished book from an amateur manuscript.
Front matter order:
- Half-title page (book title only, no author name)
- Title page (full title and author name)
- Copyright page
- Dedication (optional)
- Table of contents
- Foreword or preface (optional)
Back matter order:
- Acknowledgments
- About the author
- Also by this author
- Index (nonfiction)
- Notes and references (nonfiction)
Each front matter element should start on its own page. Use section breaks between front matter and the main body so you can apply different page numbering and header settings.
Your copyright page needs: copyright symbol and year, your name, “All rights reserved” statement, ISBN (if applicable), edition information, and your publisher name (even if that’s you).
Step 9: Insert Section Breaks and Page Breaks
Understanding the difference between page breaks and section breaks is critical for proper book formatting.
Page break (Insert > Break > Page Break): Starts a new page. Use this between chapters.
Section break (Layout > Breaks > Next Page): Starts a new page AND creates a new formatting section. Use this when you need different headers, footers, page numbering, or margins in different parts of your book.
Where to use section breaks:
- Between front matter and chapter one (different page numbering)
- Between the main body and back matter
- Wherever you need headers or footers to change
Where to use page breaks:
- Between chapters within the same section
- Between front matter elements (title page, copyright, dedication)
- At the end of a chapter to force the next one onto a new page
Pro tip: Turn on formatting marks (Home > Show/Hide ¶) so you can see exactly where your breaks are. Invisible section breaks cause more formatting headaches than any other Word feature.
Step 10: Export Your Book as a PDF
Once your formatting is complete, you need to export your book as a print-ready PDF for platforms like Amazon KDP or IngramSpark.
For print books:
- Go to File > Save As (or Export)
- Choose PDF as the file format
- Click Options and make sure “PDF/A compliant” is checked if available
- Ensure all fonts are embedded
For ebooks: Word’s native export to PDF works for some platforms, but ebooks typically require EPUB or MOBI format. You can:
- Use Kindle Create (free from Amazon) to convert your Word file to KDP format
- Use Calibre (free, open-source) to convert Word to EPUB
- Upload your .docx file directly to KDP — Amazon converts it automatically
If you’re formatting for ebook only, keep your layout simple: avoid custom page sizes, use standard Heading styles, and skip mirror margins. Ebooks are reflowable, which means the reader’s device controls the final layout. For a full walkthrough, see our ebook formatting guide.
When to Use a Dedicated Formatting Tool Instead
Word works well for straightforward formatting, but it has real limitations. If any of these apply to you, consider a dedicated tool:
- You’re publishing across multiple platforms (KDP, IngramSpark, Apple Books) and need different output formats
- You want automatic ebook generation without manual conversion
- You’re formatting multiple books and want to save time with templates
- You need advanced typography like drop caps, ornamental scene breaks, or custom running headers
Our Pick — Chapter
Chapter handles the entire book creation process, from writing through formatting to export. Instead of wrestling with Word’s margin settings and section breaks, you get professional formatting built into the writing workflow — plus AI-powered writing assistance that helps you draft, outline, and revise.
Best for: Authors who want to write and format in one tool Pricing: $97 one-time (nonfiction) Why we built it: Because formatting a book should take minutes, not hours
Other popular formatting tools include Atticus (cross-platform, modern interface), Vellum (Mac-only, beautiful templates), and Reedsy Book Editor (free, web-based). See our full book formatting software comparison for a detailed breakdown.
Common Mistakes to Avoid When Formatting in Word
- Using spaces or tabs instead of proper indentation. Set first-line indent in the Paragraph dialog — manual spacing creates inconsistencies across hundreds of pages.
- Pressing Enter to create new pages. Always use page breaks or section breaks. Extra line breaks shift when your text changes.
- Skipping mirror margins. Without mirrored margins, your text will look off-center in a bound book. Every print book needs inside margins larger than outside margins.
- Forgetting to embed fonts in your PDF. If your font isn’t embedded, the printing service substitutes a default font, destroying your layout.
- Using the same headers and page numbers throughout. Front matter, body, and back matter should each have appropriate headers and numbering — which requires section breaks.
What Trim Size Should You Use for Your Book?
The right trim size depends on your genre and platform. The most common trim size for self-published books is 6” x 9” because it’s versatile, widely accepted by all platforms, and cost-effective to print. Fiction authors often prefer 5.5” x 8.5” for a traditional novel feel. For a complete breakdown of standard book sizes and how to choose, check our trim size guide.
How Do You Format a Book in Word for KDP Specifically?
Formatting a book in Word for KDP follows the same basic steps above, with a few Amazon-specific requirements: your PDF must use 300 DPI for images, margins must meet KDP’s minimum based on your page count, and you should use PDF/A format for best results. Amazon also accepts .docx files directly for Kindle ebooks. For the full Amazon-specific walkthrough, see our KDP formatting guide.
Can You Format an Ebook in Word?
Yes, you can format a basic ebook in Microsoft Word, but the process is different from print formatting. Ebooks are reflowable — the reader controls font size and layout. Use standard Heading styles, avoid custom page sizes, remove mirror margins, and keep your design simple. You can upload a .docx file directly to KDP for Kindle, or convert to EPUB using free tools like Calibre. For complex ebook layouts, dedicated software like Atticus or Vellum produces cleaner results. See our full ebook formatting guide for details.
FAQ
How long does it take to format a book in Word?
Formatting a book in Word takes 4 to 8 hours for a first-time author working through all settings manually. Experienced formatters can complete a standard novel layout in 2 to 3 hours. The most time-consuming steps are configuring section breaks, headers, and page numbering for front matter versus body content.
Is Microsoft Word good enough for book formatting?
Microsoft Word is good enough for basic book formatting, especially for straightforward novels and nonfiction books. It handles trim sizes, margins, fonts, and PDF export well. However, Word lacks advanced features like automatic ebook generation, ornamental scene breaks, and multi-format export that dedicated tools like Chapter, Vellum, and Atticus provide.
What is the best font for a book formatted in Word?
The best font for a book formatted in Word is Garamond at 11pt for body text. Garamond is the publishing industry’s most widely used book font because of its excellent readability and elegant letterforms. Georgia and Palatino are strong alternatives. Avoid using Comic Sans, Arial, or decorative fonts for body text — they reduce readability over long passages.
Do I need to buy special software to format a book?
You do not need special software to format a book — Microsoft Word can handle the entire process for both print and basic ebook formatting. However, dedicated book formatting software like Chapter, Vellum, or Atticus can save significant time by automating trim sizes, margins, and multi-format export. If you’re publishing multiple books, the time savings usually justify the investment.
What margins should I use for a 6x9 book in Word?
For a 6” x 9” book in Word, use 0.75” top and bottom margins, 0.5” outside margins, and a 0.75” gutter (inside margin) for books under 300 pages. For books over 300 pages, increase the gutter to 0.85” or 1” to account for the thicker spine. Always enable mirror margins so left and right pages are properly mirrored.